Switch Skills in Monster Hunter Rise (MHR or MHRise) refer to swappable moves in a Weapon's moveset. Each of the 14 Weapon-types have 3 sets of 2 moves that can be switched out with each other, allowing for a diverse, customizable approach to combat. Switch Skills are unlocked by progressing in the game, with each set having a default move that is available from the beginning.
- Each Weapon-type has a set of swappable Silkbind Attacks and 2 sets of swappable standard moves in the base game.
- The second set of Switch Skills are unlocked by forging or upgrading 8 Weapons within a Weapon-type. Note that this needs to be done for every Weapon-type that you want to unlock Switch Skills for.
- The third set of Switch Skills are unlocked by completing the associated High Rank Hub Quest given by Master Utsushi. These quests are unlocked by gaining access to the required Hub Quest rank:
- Lv. 4⭐ Hub Quests for the Sword & Shield, Hunting Horn, Switch Axe and Light Bowgun.
- Lv. 5⭐ Hub Quests for the Great Sword, Hammer, Lance, Charge Blade and Heavy Bowgun.
- Lv. 6⭐ Hub Quests for the Long Sword, Dual Blades, Gunlance, Insect Glaive and Bow.
- Once unlocked, Switch Skills can be swapped at any Item Box and Switch Skill combinations can be saved to Item Loadouts as well.
- The Sunbreak Expansion introduces the Switch Skill Swap mechanic, where hunters can preload 2 Switch Skill loadouts and swap between them freely during hunts. Hunters will also now have access to a total of 5 sets of swappable Switch Skills, including new Silkbind Attacks and regular moves.
- This expansion also introduces the Swap Evade, a special dodge maneuver that can be performed right after a Switch Skill Swap, allowing hunters to quickly evade and maintain distance while safely swapping skill sets.
- In the tables below, the left column represents default moves available from the beginning, while the right represents unlockable Switch Skills. (Note: Details regarding Sunbreak Switch Skills and which ones they swap out with are yet to be confirmed and will be updated when more info is revealed)
Switch Skill Swap Mechanic
The Switch Skill Swap mechanic allows the hunter to assign Switch Skill loadouts and swap between them on the fly, whether in combat or otherwise. This allows the hunter to further expand their arsenal of available moves during hunts and to further customize their builds to accommodate their playstyle. Being able to make split-second decisions to swap loadouts and use specific moves to counter monster attacks as they wind up is sure to add an exciting new dimension to monster hunting.
With the Switch Skill Swap mechanic, hunters are given two loadouts to switch between, denoted by the ![]() Red Scroll and
Red Scroll and ![]() Blue Scroll icons on the UI. Hunters can set up each loadout from the Item Box at Kamura Village, Elgado Outpost or even at Camps while out on hunts, just as they would when assigning Switch Skills individually. When out on hunts, hunters can swap between the two loadouts by holding
Blue Scroll icons on the UI. Hunters can set up each loadout from the Item Box at Kamura Village, Elgado Outpost or even at Camps while out on hunts, just as they would when assigning Switch Skills individually. When out on hunts, hunters can swap between the two loadouts by holding ![]() and pressing the
and pressing the ![]() +
+ ![]() buttons. The character will perform a quick animation and briefly flash with energy, signifying a successful swap.
buttons. The character will perform a quick animation and briefly flash with energy, signifying a successful swap.

This swapping mechanic will apply to both Silkbind Attacks and regular Switch Skills, allowing hunters access to moves that use the same input command during the same hunt that they would otherwise not have access to without manually swapping them at the home base or in Camps.
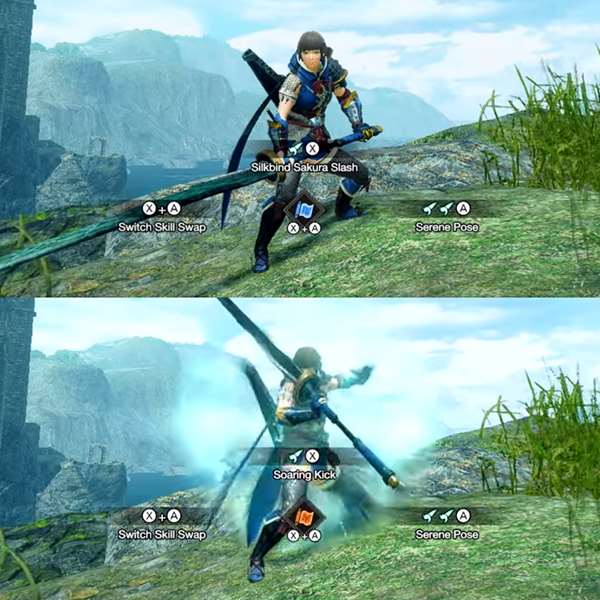
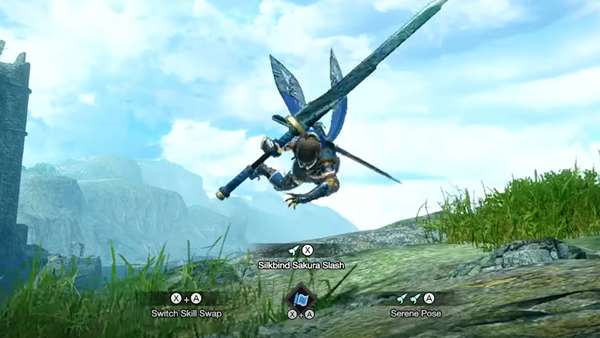
For example, you normally cannot have both the Longsword's Soaring Kick and Silkbind Sakura Slash active at the same time because they both use the ![]() +
+ ![]() input, nor can you have access to the Switch Axe's Forward Slash and Forward Overhead Slash at the same time as they both use the
input, nor can you have access to the Switch Axe's Forward Slash and Forward Overhead Slash at the same time as they both use the ![]() +
+ ![]() input. With the Switch Skill Swap mechanic, this limitation is eliminated and hunters can now have both sets of moves available for use. Thanks to the mechanic's virtually non-existent cooldown, swapping sets is now possible mid-combat and even mid-combo, providing hunters with an incredible amount of versatility when it comes to their moveset.
input. With the Switch Skill Swap mechanic, this limitation is eliminated and hunters can now have both sets of moves available for use. Thanks to the mechanic's virtually non-existent cooldown, swapping sets is now possible mid-combat and even mid-combo, providing hunters with an incredible amount of versatility when it comes to their moveset.
Finally, the Switch Skill Swap mechanic also brings with it the Swap Evade, which is a special, flashy dodge maneuver that can be performed during a small window directly after swapping Switch Skill loadouts, allowing hunters to evade incoming attacks and maintain their distance with ease. Hunters can use the Swap Evade to dodge in any direction. This new move not only provides a quick repositioning tool after the hunter performs an action that leaves them vulnerable, but it also serves to shorten the recovery time of the Switch Skill Swap animation itself. This allows for a smooth transition between swapping loadouts and resuming the assault on a monster for a truly masterful hunting experience.
All Switch Skills in Monster Hunter Rise
Switch Skills by Weapon:
Long Sword
| NEW! Long Sword Switch Skills introduced with the Sunbreak Expansion | |
|---|---|
| Switch Skills Set 1 | |
Step Slash |
Drawn Double Slash |
| A top-down slash while moving forward. The blade takes a vertical path, making it a useful technique when aiming up high.
|
A drawn attack that unleashes a vertical then horizontal slash. As you move forward, you're able to absorb a hit while attacking. Although it deals more damage than a Step Slash, there are few attacks that you can use to follow up. Use at your discretion.
|
Controls
|
Controls
|
| Switch Skills Set 2 | |
Spirit Roundslash Combo |
Switch Skill Name |
| Changes into a Spirit Blade on its third strike and onwards. Follows from a Spirit Blade III into a Spirit Roundslash. A basic Spirit Blade combo. Easy to hit the target while damaging any other enemies close by. |
Switch Skill Description |
Controls
|
Controls |
| Switch Skills Set 2 | |
Special Sheathe Combo |
Sacred Sheathe Combo |
| A special sheath that can be performed after attacking. Both of its follow-up attacks fill the Spirit Gauge. An Iai Slash automatically increases Spirit Gauge. Successfully countering a monster attack with an Iai Spirit Slash unleashes a powerful flash and raises the Spirit Gauge by one level.
|
A slow methodical movement that can be executed following an attack.
|
Controls
|
Controls
|
| Switch Skills Set 4 (Silkbind) | |
Soaring Kick |
Silkbind Sakura Slash |
| A quick Wirebug-induced jump kick. A missed kick ends the attack with a single slash, while a successful kick can be followed with one of two moves. The Plunging Thrust increases Spirit Gauge, while the Spirit Helm breaker reduces the Spirit Gauge by one level. (Wirebug Gauge recovery speed: Slow)
|
A whirlwind-like attack, dashing and slicing past the target with a Wirebug. The hit causes multiple lacerations over time, inducing additional damage. The hit raises the Spirit Gauge by 1. (Wirebug Gauge recovery speed: Slow)
|
| Controls
|
Controls
|
Tempered Spirit Blade |
|
| A decisive Silkbind maneuver that parries any incoming monster attack with a Spirit Blade. Timing is key if you want to successfully parry an attack, but doing so will fill your Spirit Gauge and raise it one level. (Wirebug Gauge recovery speed: Fast)
|
|
| Controls
|
|
| Switch Skills Set 5 (Silkbind) | |
Serene Pose |
Harvest Moon |
| A move that casts out Ironsilk, and automatically counters any incoming attack. Like a reflection of the moon, it's visible, but untouchable. If a hit is countered, one level of Spirit Gauge will be consumed. (Wirebug Gauge recovery speed: Fast)
|
A move that casts out an Ironsilk ring that narrows your range of attack, but boosts spirit so you can go on the offensive. Within the ring, your Spirit Gauge won't deplete, and if you perform any counter attacks, it will add additional hits. (Wirebug Gauge recovery speed: Medium)
|
Controls
|
Controls
|
Great Sword
| NEW! Great Sword Switch Skills introduced with the Sunbreak Expansion | |
|---|---|
| Switch Skills Set 1 | |
Tackle |
Guard Tackle |
| A shoulder thrust that withstands all attacks. Prevents knockbacks as well as getting knocked down, making it useful for standing your ground while charging.
|
A forward-dashing attack using the flat side of the blade. more cumbersome than your standard tackle, but strong and allows you to guard. A successful Guard can be followed up with a powerful Charged Attack.
|
Controls
|
Controls
|
| Switch Skill Set 2 | |
True Charged Slash |
Switch Skill Name |
| A devastating Charged Slash attack delivering extensive damage, striking twice by making a large swing with the weapon. By striking the monster's softer weak spot with the first strike, the second strike deals additional damage. |
Switch Skill Description |
| Controls
|
Controls |
| Switch Skills Set 3 | |
Charged Slash Combo |
Surge Slash Combo |
| The bread-and-butter great sword combo. Built off of the Charged Slash, many a hunter knows this combo by heart.
|
An offensive style that combines speed with the weight of the weapon to unleash a stream of powerful slashes. Proper footwork is required, but allows for a large number of combos.
|
Controls
|
Controls
|
| Switch Skills Set 4 (Silkbind) | |
Hunting Edge |
Strongarm Stance |
| A daring aerial attack, using a Wirebug to fly up for a hefty Roundslash. If the attack connects, the hunter bounces upward and transitions directly into the next Charged Slash attack, forming the crux of this attack. (Wirebug Gauge recovery speed: Fast)
|
A technique that uses Ironsilk to reinforce both your arms and weapon temporarily to fend off attacks. If used while charging, you can quickly parry an attack and then unleash a fierce onslaught afterwards. (Wirebug Gauge recovery speed: Fast)
|
Controls
|
Controls
|
| Switch Skills Set 5 (Silkbind) | |
Power Sheathe |
Backslide |
| A Wirebug technique to prepare for the next attack, auto-sheathing as you draw in and boosting attack power briefly. You can either close the gap ready for the next attack, or pull back to evade, making this an all-around technique. (Wirebug Gauge recovery speed: Fast)
|
A quick evasive move using a Wirebug. Watch out for an opening while charging and upping attack level, and maintain charge during Surge Slash Combo-based moves. Fine tune your evasive move with (Wirebug Gauge recovery speed: Fast)
|
Controls
|
Controls
|
Sword & Shield
| NEW! Sword & Shield Switch Skills introduced with the Sunbreak Expansion | |
|---|---|
| Switch Skills Set 1 | |
Advancing Slash |
Sliding Slash |
| A drawn attack where you perform a downward slash while stepping forward. A quick and effective action that negates staggering and knockbacks.
|
A sliding attack that slashes the target twice. The Slide maneuver reaches far, but lacks the ability to turn. Successfully landing the first hit or inputting the necessary command while sliding allows for a follow-up jumping attack.
|
Controls
|
Controls
|
| Switch Skills Set 2 | |
Hard Basher Combo |
Switch Skill Name |
| A derivative of the Shield Slam. Shield Bash > Hard Bash. A melee attack using nothing but a shield. A direct hit to the head, however, may open up more opportunities. |
Switch Skill Description |
Controls
|
Controls |
| Switch Skills Set 3 | |
Sword/Shield Combo |
Twin Blade Combo |
| A two-hit attack that uses both the sword and shield. This traditional combo opens with a horizontal shield swipe and then follows up with a stepping downward slash.
|
A two-part attack that opens with a circular slash and follows up with a blade thrust. An easy attack to get multiple hits in with, so ideal for weapons with high elemental and status properties.
|
| Controls
|
Controls
|
| Switch Skills Set 4 (Silkbind) | |
Windmill |
Destroyer Oil |
| A multi-stage attack using a Wirebug's silk to spin the weapon around. Any incoming attack can be negated while the weapon is spinning. (Wirebug Gauge recovery speed: Fast)
|
Uses a Wirebug to cover your blade with a special ointment whose effects trigger if ignited by friction with your shield. While active, monsters flinch more easily, creating more openings for attack. (Wirebug Gauge recovery speed: Medium)
|
Controls
|
Controls
|
| Switch Skills Set 5 (Silkbind) | |
Falling Shadow |
Shield Bash |
| A technique that uses a Wirebug to leap forward and attack. If the attack lands, you will perform a Scaling Slash which can be chained into various finishing attacks. (Wirebug Gauge recovery speed: Fast)
|
A combined offensive and defensive move using a Wirebug to dash forward with your shield raised. If the attack connects with a monster, you can instantly follow up with a variety of attacks. If timed right, you can even parry an incoming attack and then continue your assault. (Wirebug Gauge recovery speed: Fast)
|
Controls
|
Controls
|
Dual Blades
| NEW! Dual Blades Switch Skills introduced with the Sunbreak Expansion | |
|---|---|
| Switch Skills Set 1 | |
Demon Flurry Rush |
Demon Flight |
| A spinning multi-hit attack performed on the ground. Only available when Demon Mode or Archdemon Mode is active. An effective move with reliable dash capabilities and versatility.
|
An attack performed by slamming down both blades. A successful hit vaults you into the air, slicing your target as you spin upwards. Highly effective against larger monsters and those in weak spots up high. Easy to follow up with a Midair Spinning Blade Dance.
|
Controls
|
Controls
|
| Switch Skills Set 2 | |
Demon Mode |
Switch Skill Name |
| A move made to exceed one's limits. While active, your stamina gradually decreases while your attack and evasion change, resisting any knockback. Movement speed increases dramatically, allowing you to roam the field like a force of nature. |
Switch Skill Description |
| Controls
|
Controls |
| Switch Skills Set 3 | |
Roundslash Combo |
Slide Slash Combo |
| A slashing attack that allows you to reposition. Use this attack to continue a combo or change direction giving you the ability to keep up the pressure on a targeted spot.
|
Float like a butterfly, sting like a bee. This technique allows you to attack while evading, and if you work it into your combos, you can unleash a relentless attack that's difficult to defend against. |
Controls
|
Controls
Note: If there is no directional input, you will perform a Left Slide Slash by default. |
| Switch Skills Set 4 (Silkbind) | |
Piercing Bind |
Spiral Slash |
| An attack that drives a blade bound by Ironsilk into the target like a stake. The blade remains connected to the hunter by Ironsilk, dealing additional slash damage to the same spot every time you attack. The added damage accumulates overtime, eventually unleashing massive damage. (Wirebug Gauge recovery speed: Slow)
|
A Silkbind attack that launches you spiraling forwards. Once your attack connects, your body acts as a drill as your blades bore into your target's flesh. Note: You can also perform a Spiral Slash midair. Note: You can also perform a Spiral Slash midair. (Wirebug Gauge recovery speed: Medium)
|
Controls
|
Controls
|
| Switch Skills Set 5 (Silkbind) | |
Shrouded Vault |
Ironshine Silk |
| A technique that uses a Wirebug to close in rapidly on the enemy, while instantly countering any attacks. Perfect for a good start in battle, as you can jump straight to the heart of the action without fear of taking a hit. (Wirebug Gauge recovery speed: Medium)
|
An ingenious Silkbind technique that uses turbulence from evading to sharpen your blades. Even with Shrouded Vault, and other evades, sharpness recovers if you time it right. (Wirebug Gauge recovery speed: Fast)
|
Controls
|
Controls
|
Lance
| NEW! Lance Switch Skills introduced with the Sunbreak Expansion | |
|---|---|
| Switch Skill Set 1 | |
Guard |
Switch Skill Name |
| Ready your shield to block attacks. A large shield can defend against many an assault. |
Switch Skill Description |
Controls
|
Controls |
| Switch Skills Set 2 | |
Dash Attack |
Shield Charge |
| A charging attack using the Lance. You can continue to speed up for a certain amount of time by gaining momentum. The charge attack continues until you choose to cancel it, have no more stamina, or crash into a wall.
|
A charging attack with the shield up. You can dash for a limited amount of time while fending off attacks with the shield. Crashing into a monster will cause shield-based blunt damage, making it an offensive and defensive skill.
|
Controls
|
Controls
|
| Switch Skills Set 3 | |
Guard Dash |
Shield Tackle |
| A technique that allows mobility while guarding with your shield. If performed after an attack you can move in any direction, forward, backward, left, and right.
|
A technique where you charge forward with your shield raised. As your shield is raised, you're able to guard against incoming attacks. You can also follow up with a variety of thrusting attacks. Watch for an opening and then unleash an unrelenting series of attacks.
|
Controls
|
Controls
|
| Switch Skills Set 4 (Silkbind) | |
Anchor Rage |
Skyward Thrust |
| A defensive skill requiring a shield and some patience. The technique is to efficiently brace and absorb the power of the incoming attack - a high-risk move, but the more power absorbed, the greater the damage. (Wirebug Gauge recover speed: Medium)
|
A technique where a Wirebug launches you high into the air. Thrust your lance towards the heavens and then pierce the earth. Note: The falling portion of the attack inflicts multiple hits. (Wirebug Gauge recover speed: Medium)
|
Controls
|
Controls
|
| Switch Skills Set 5 (Silkbind) | |
Twin Vine |
Sheathing Retreat |
| A technique that draws a monster's attention by thrusting a kunai tethered with Ironsilk into it. While the kunai is lodged, the hunter can leap in close to the target with a Closed Jump. In addition, stamina consumption while guarding is reduced. (Wirebug Gauge recover speed: Medium)
|
A technique that automatically sheathes your weapon while using a Wirebug to pull you backwards out of harm's way. No matter how effective your shield is, if you sense life-threatening danger, retreat is the wisest choice. (Wirebug Gauge recover speed: Slow)
|
Controls
|
Controls
|
Gunlance
| NEW! Gunlance Switch Skills introduced with the Sunbreak Expansion | |
|---|---|
| Switch Skills Set 1 | |
Charged Shelling |
Switch Skill Name |
| A shelling attack that utilizes residual heat. Unleashes a fortified shot, though this requires extra time to load. |
Switch Skill Description |
Controls
|
Controls |
| Switch Skills Set 2 | |
Quick Reload |
Switch Skill Name |
| An action for shell reloads. Allows for quicker shell reloading after an attack. While it reloads shells to max capacity, it does not reload Wyrmstake Shots. |
Switch Skill Description |
Controls
|
Controls
|
| Switch Skills Set 3 | |
Wyrmstake Cannon |
Erupting Cannon |
| An attack that impales a monster with a stake from your gunlance. The effects of each stake differs depending on the gunlance's shelling type. Normal and long shelling types detonate after multiple hits, while the wide shelling types only detonates a single blast, but can stun monsters.
|
This technique involves firing an exploding stake into your target. When using the Eruption Cannon, the tip of the gunlance heats up and slashing attacks are enhanced for a certain period of time.
|
Controls
|
Controls
|
| Switch Skills Set 4 (Silkbind) | |
Hail Cutter |
Ground Splitter |
| Uses a Wirebug to launch you upwards performing a Rising Slash on the way up and an Overhead Smash on the way down. You can reload in midair, which reduces the cooldown time for Wyvern's Fire. (Wirebug Gauge recover speed: Fast)
|
Uses a Wirebug to move forward and jump into a vigorous upward slash. Scraping the Gunlance on ground heats up the barrel, temporarily increasing the damage dealt by shells, Wyrmstake Shots, and Wyvern's Fire. (Wirebug Gauge recover speed: Slow)
|
Controls
|
Controls
|
Bullet Barrage |
|
| Uses a Wirebug to Blast Dash toward your target, unleashing everything with abandon. Be careful: Shells, Wyrmstake Cannon, and Wyvern's Fire will automatically be reloaded first before performing the attack. (Wirebug Gauge recover speed: Medium)
|
|
Controls
|
|
| Switch Skills Set 5 (Silkbind) | |
Guard Edge |
Reverse Blast |
| A strong blocking stance utilizing Wirebug silk. You also enjoy bonus sharpness recovery if you get the timing right. After a successful guard, you can combo into a variety of different attacks. (Wirebug Gauge recovery speed: Medium)
|
A rapid, backward evasive maneuver using a Wirebug to stop. If no shells are loaded, you'll do a quick reload, so act with caution. (Wirebug Gauge recovery speed: Fast)
|
Controls
|
Controls
|
Hammer
| NEW! Hammer Switch Skills introduced with the Sunbreak Expansion | |
|---|---|
| Switch Skill Set 1 | |
Side Smash |
Switch Skill Name |
| A side swipe with the hammer. Can be used as a starting point for a Big Bang combo. |
Switch Skill Description |
Controls
|
Controls |
| Switch Skills Set 2 | |
Charge Switch: Strength |
Switch Skill Name |
| A special action affecting charge attacks. Lengthens required charge time, but allows for more powerful actions. |
Switch Skill Description |
Controls
|
Controls |
| Switch Skills Set 3 | |
Spinning Bludgeon |
Spinning Bludgeon: Charge |
| Charge as you advance to unleash a devastating spinning attack. The attack hits with each rotation allowing you to land multiple successive blows. In addition, the number of rotations determines which attack can be performed next.
|
A technique that stores released power and funnels it into the next Charge Switch attack. Power is built up when performing a Spinning Bludgeon. The charge level is then maintained when executing a Charge Switch. Make good use of this to unleash a series of level 3 charged attacks.
|
Controls
|
Controls
|
| Switch Skills Set 4 (Silkbind) | |
Silkbind Spinning Bludgeon |
Dash Breaker |
| A spinning attack using a Wirebug. It moves along an arc pattern much like midair spinning attacks performed on a slope, but is just as effective on flat terrain. (Wirebug Gauge recover speed: Fast)
|
An attack performed by rushing forward with the help of a Wirebug. A simple skill evoking the philosophy of "beelining and then smashing." Any enemy attack damage is negated while launching forward. (Wirebug Gauge recover speed: Fast)
|
Controls
|
Controls
|
Keeping Sway |
|
| A maneuver that uses a Wirebug to quickly evade an attack at high speed. By using a Wirebug, you're able to maintain your charge during the evade. (Wirebug Gauge recovery speed: Fast)
|
|
Controls
|
|
| Switch Skills Set 5 (Silkbind) | |
Impact Crater |
Impact Burst |
| A Silkbind attack that makes you leap in the air and come down with multiple earth-shattering strikes. The power of the attack and number of hits you'll land are determined by your charge level at the start of the attack. (Wirebug Gauge recovery speed: Fast)
|
A Silkbind attack that wraps your weapon in Ironsilk. For a short period of time, any charged attack performed causes the silk to vibrate, creating a shockwave that makes it easier to flinch monsters. (Wirebug Gauge recovery speed: Medium)
|
Controls
|
Controls
|
Hunting Horn
| NEW! Hunting Horn Switch Skills introduced with the Sunbreak Expansion | |
|---|---|
| Switch Skills Set 1 | |
Overhead Smash |
Switch Skill Name |
| A mighty attack that swings the hunting horn down from above. Effective in reducing the target's stamina. |
Switch Skill Description |
Controls
|
Controls |
| Switch Skills Set 2 | |
Melody Mode: Performance |
Melody Mode: Echo |
| Changes the way melodies are played. Two attacks of the same note in a row generates a melody effect. Using A mode focused on being aggressive.
|
Changes the way melodies are played. Press A mode useful for applying various melody effects at once.
|
Controls
|
Controls
|
| Switch Skills Set 3 | |
Crush Attack Combo |
Swing Combo |
| A combo that uses Swing and Crush attacks. Useful from a fixed position and from close range. The combo loop varies depending on button input.
|
A two-hit attack that can be delivered from either the left or right. This allows you to quickly shift directions, making it useful for repositioning.
|
Controls
|
Controls
|
| Switch Skills Set 4 (Silikbind) | |
Earthshaker |
Sonic Bloom |
| An attack that drvies an Ironsilk-bound blade into the target like a stake. When it hits, the Wirebug and weapon are connected with silk. The vibrations of the weapon's sonic blast explode inside the target. (Wirebug Gauge recovery speed: Medium)
|
Places a Wirebug cocoon on the ground that's tethered to you with Ironsilk. When attacking, vibrations are sent to the silk and stored in the cocoon, which gradually swells. After a certain number of Performances, the energy stored detonates, dealing stund and exhaust damage. (Wirebug Gauge recovery speed: Medium)
|
Controls
|
Controls
|
| Switch Skills Set 5 (Silikbind) | |
Slide Beat |
Silkbind Shockwave |
| A technique that uses a Wirebug to push ahead with repeated attacks, punctuated by a performance that buffs strength. It serves the dual purpose of closing in on your enemy and boosting your power. (Wirebug Gauge recovery speed: Fast)
|
A Silkbind attack that wraps your weapon in Ironsilk. For a short period of time, any attack performed causes the silk to vibrate, creating a time-delayed shockwave that triggers additional hits. These additional hits do major stun, exhaust, and part damage (Wirebug Gauge recovery speed: Medium)
|
Controls
|
Controls
|
Switch Axe
| NEW! Switch Axe Switch Skills introduced with the Sunbreak Expansion | |
|---|---|
| Switch Skills Set 1 | |
Forward Slash |
Switch Skil Name |
| Thrusts the axe's blade forward while stepping. Doesn't do a lot of damage, but is versatile. |
Switch Skill Description |
Controls
|
Controls |
| Switch Skills Set 2 | |
Finishing Discharge |
Switch Skill Name |
| A finishing blow for the Element Discharge. Performs a thrust attack while fortifying elemental energy, ending with a massive explosion. If your Amp Gauge is full and the target is a large monster, the action becomes a Zero Sum Discharge Finisher. |
Switch Skill Description |
Controls
|
Controls |
| Switch Skills Set 3 | |
Axe: Wide Sweep |
2-Staged Morph Slash Combo |
| A technique that closes the distance to your target by using the centrifugal force of swinging with an Axe: Wild Swing. Useful for when the target is out of swinging range, or when you want to get in close for Sword Mode attacks.
|
A two-staged Morph Slash attack that follows an Axe: Wild Swing. 1st Stage: Morphs into Sword Mode. During this combo, the power of Sword Mode attacks increase and Axe Mode attacks fill the Switch Gauge faster.
|
Controls
|
Controls
|
| Switch Skills Set 4 (Silkbind) | |
Invincible Gambit |
Soaring Wyvern Blade |
| A technique using a Wirebug to surge forward and dish out three strikes. You will be impervious to knockdowns until the strikes are completed, making this attack useful in a slugfest or pinch. (Wirebug Gauge recovery speed: Medium)
|
Uses a Wirebug to fly up while slashing, ending with an Advancing Slash from midair. If the Advancing Slash is successful, the weapon's Amp Gauge fills up, a large explosion goes off where it connected. (Wirebug Gauge recovery speed: Medium)
|
Controls
|
Controls
|
Wire Step |
|
| A Wirebug-based evasion technique that allows you to morph into Axe Mode while flanking the enemy. Highly effective for maneuvering while in Axe Mode. (Wirebug Gauge recovery speed: Fast)
|
|
Controls
|
|
| Switch Skills Set 5 (Silkbind) | |
Switch Charger |
Elemental Burst Counter |
| A technique that uses a Wirebug to restore your Switch Gauge as you move. Once active, your Switch Gauge won't deplete for a while, so use this technique to gain the advantage at the start of the battle. (Wirebug Gauge recovery speed: Medium)
|
Compresses Switch Gauge energy, that can be released as an Elemental Burst. If the burst is released right as a monster attacks, you'll perform a Power Finisher and your switch axe will go into an Amped State. (Wirebug Gauge recovery speed: Fast)
|
Controls
|
Controls
|
Charge Blade
| NEW! Charge Blade Switch Skills introduced with the Sunbreak Expansion | |
|---|---|
| Switch Skills Set 1 | |
Morph Slash |
Switch Skill Name |
| Sword to axe, axe to sword. This switching attack forms the basis of a Charge Blade. Right as the weapon begins switching to an axe, or right as it is about to finish switching to a sword, the shield is raised to block incoming attacks. |
Switch Skill Description |
Controls
|
Controls |
| Switch Skills Set 2 | |
Condensed Element Slash |
Condensed Spinning Slash |
| While Charging, elemental energy gathers on the sword to strengthen it and generate a powerful bash effect. The damage dealt by the sword temporarily increases, and incurs additional damage. Reinforcing the sword with this skill, however, requires the shield to also be elementally boosted.
|
Activates the Element Regeneration system while charging. The shield rotates and acts as a spinning saw blade. This technique switches the weapon into Axe Mode, allowing multiple hits until the mode is disengaged. Longer hits in Axe Mode turn the energy into phials.
|
Controls
|
Controls
|
| Switch Skills Set 3 | |
Phial Follow-up |
Phial Follow-up: Firing Pin |
| A mechanism in which a small explosion is triggered by Shield Thrust during Elemental Boost or by sword attacks while in Sword Boost Mode. Functions as support when attacking in Sword Mode.
|
A mechanism that lowers the pressure of elemental energy generated through Shield Thrust during Elemental Boost, or by sword attacks while in Sword Boost Mode. The elemental energy generated builds up on your target, but disappears over time. It can be detonated by any attack in Axe Mode, and extending the time limit of the Elemental Boost.
|
Controls
|
Controls
|
| Switch Skills Set 4 (Silkbind) | |
Counter Peak Performance |
Ready Stance |
| A Guard technique using Wirebug silk. If an attack is successfully blocked, phials are filled, and you can lead into various attack-focused actions. (Wirebug Gauge recovery speed: Medium)
|
A Silkbind maneuver that binds sword and axe together with Ironsilk. After guarding, a heavy knockback leaves you in Sword Mode, and lowers your guard reaction so you're able to chain sword/axe attacks. (Wirebug Gauge recovery speed: Fast)
|
Controls
|
Controls
|
| Switch Skills Set 5 (Silkbind) | |
Morphing Advance |
Air Dash |
| A Silkbind technique for quickly closing the distance to your target while morphing into Axe Mode. While advancing, you're immune to knockback and attacks that send you flying. You can also follow up by morphing back into Sword Mode. (Wirebug Gauge recovery speed: Fast)
|
A Wirebug-based technique where you rise up while whirling an axe, then propel yourself away with a Phial Explosion. Damage often leaves monsters mountable, and you can control your fall direction to some degree. If no Phial Explosion is detonated, you'll fall straight down. (Wirebug Gauge recovery speed: Fast)
|
Controls
|
Controls
|
Insect Glaive
| NEW! Insect Glaive Switch Skills introduced with the Sunbreak Expansion | |
|---|---|
| Switch Skills Set 1 | |
Leaping Slash |
Switch Skill Name |
| A downward slash technique performed while lunging forward. This attack can negate knockbacks without Orange Extracts. A versatile skill that can reach higher areas with its attack. |
Switch Skill Description |
Controls
|
Controls |
| Switch Skills Set 2 | |
Tornado Slash |
Tetraseal Slash |
| A hefty slash performed after a bludgeoning attack, using the entire body to swing the weapon. The second strike is particularly powerful while remaining versatile.
|
An attack that delivers four strikes on the spot. One of these strikes will mark the monster, which will attract Powder Type Kinsects.
|
Controls
|
Controls
|
| Switch Skills Set 3 | |
Jumping Advancing Slash |
Kinsect Slash |
| A technique that consumes stamina to perform a midair slash. If you have red extract absorbed, you'll perform a multi-hit Strong Jumping Advancing Slash instead. Landing either Slash will follow up with a Vaulting Dance.
|
A mid-air technique where you thrust forward with your glaive and Kinsect. If the slash connects, you'll perform a Vaulting Dance, absorbing extract.
|
Controls
|
Controls
|
| Switch Skills Set 4 (Silkbind) | |
Recall Kinsect |
Awakened Kinsect Attack |
| An emergency evasion performed with a Wirebug that recalls your Kinsect. As the Kinsect returns, it will perform spinning attacks that scatter healing extracts. Its stamina will fully recover as it returns, and its stamina depletion will be reduced for a while afterwards. (Wirebug Gauge recovery speed: Medium)
|
A technique where you hurl a Kinsect to inflict massive damage. All extracts are consumed and the more extract you have, the more potent this attack will be. After launching the Kinsect, you'll close in using a Wirebug; simultaneously absorbing extract, marking the target, and then chaining into a Vaulting Dance. (Wirebug Gauge recovery speed: Medium)
|
Controls
|
Controls
|
| Switch Skills Set 5 (Silkbind) | |
Silkbind Vault |
Kinsect Glide |
| A Silkbind attack in which you perform a forward-leaping attack. Also useable midair, you can close in on a target quickly by following up with either a Midair Evade or Jumping Advancing Slash. (Wirebug Gauge recovery speed: Fast)
|
A technique that sends your Kinsect out and uses a Wirebug to quickly jump to it. The Kinsect normally aims for a marker, but in the absence of a marker, it will fly forward or follow the reticle. When your Kinsect comes in contact with a monster, it'll absorb extract. (Wirebug Gauge recovery speed: Fast)
|
Controls
Note: As with Vaulting Dance, attack power increases with each successive use. |
Controls
Note: Other variations are possible based on your Switch Skill loadout. |
Light Bowgun
| NEW! Light Bowgun Switch Skills introduced with the Sunbreak Expansion | |
|---|---|
| Switch Skills Set 1 | |
Forward Dodge |
Switch Skill Name |
| An evasive maneuver that you can perform when your weapon is drawn. As gunners are more likely to be in danger from being hit, evasive maneuvers to keep distance from their target is important. |
Switch Skill Description |
Controls
|
Controls |
| Switch Skills Set 2 | |
Reload |
Switch Skill Name |
| Executes a reload. Reload speed depends on ammo type and the weapon's capabilities. |
Switch Skill Description |
Controls
|
Controls
|
| Switch Skills Set 3 | |
Marksman |
Critical Firepower |
| A style of shooting that draws out the true potential of ammo.
|
A special shooting style that further raises damage output but narrows critical distance and increases recoil. Because the distance at which the power of ammo is most effective has been reduced, you will need to be aware and adjust your firing position. Note: Does not apply to certain ammo types.
|
| Controls
|
Controls
|
| Switch Skills Set 4 (Silkbind) | |
Fanning Vault |
Fanning Maneuver |
| A jumping action using Wirebugs. Shots can be fired while in midair. While airborne, you can fire Wyvernblasts directly underneath to land a direct hit on a monster. (Wirebug Gauge recovery speed: Fast)
|
A maneuver using a Wirebug and centrifugal force to quickly flank left or right. Also temporarily ups attack power. Shots can be fired while in motion. (Wirebug Gauge recovery speed: Fast)
|
Controls
|
Controls
|
Wyvern Counter |
|
| An urgent retreat that fires a shot with massive recoil, using a Wirebug to stop. While not a powerful attack, its true value comes when it's used to evade incoming attacks. (Wirebug Gauge recovery speed: Fast)
|
|
Controls
|
|
| Switch Skills Set 5 (Silkbind) | |
Silkbind Glide |
Mech Silkbind Shot |
| A technique that uses a Wirebug to pull you forward. If can be followed up with a powerful close-range attack that blasts Ironsilk into the target dealing severing damage. After the attack, whatever ammo was previously loaded will be automatically reloaded. (Wirebug Gauge recovery speed: Medium)
|
Purified ammos is loaded with Ironsilk, allowing you to unleash an onslaught of shots. each shot laced with Ironsilk lodges into the monster, and if any follow-up attacks hit the lodged ammo, the silk reacts, increasing the chance of leaving the part broken or the monster mountable. (Wirebug Gauge recovery speed: Medium)
|
Controls
|
Controls
Note: The effects of this Silkbind only last for a certain amount of time. |
Heavy Bowgun
| NEW! Heavy Bowgun Switch Skills introduced with the Sunbreak Expansion | |
|---|---|
| Switch Skills Set 1 | |
Melee Attack |
Switch Skill Name |
| A bludgeoning attack delivered by directly smashing with the weapon. Delivers impressive damage, and may even stun your target. If a shield is equipped, incoming attacks can be blocked while executing your attack. |
Switch Skill Description |
Controls
|
Controls |
| Switch Skills Set 2 | |
Mech-Wyvernsnipe |
Healing Mech-Wyvernsnipe |
| Fires a specialized shot, different depending on the weapon. The number of rounds is managed via its own gauge and replenishes over time.
|
Fires a specialized shot, different depending on the weapon. The number of rounds is managed via its own gauge and replenishes over time. Regular Wyvernheart and Wyvernsnipe shells inflict less damage, but hits will replenish the hunter's health.
|
Controls
|
Controls
|
| Switch Skills Set 3 | |
Charged Shot |
Crouching Shot |
| A style of shooting that accumulates power by charging a shot. The amount of power a shot is increased by is determined by how long the shot was charged.
|
A style of shooting that utilizes a special stance to reduce recoil. In exchange for not being able to move, you're able to fire in rapid succession. The longer you fire, the shorter the firing interval becomes, but at the risk of overheating your bowgun. If your bowgun overheats, it can't be fired until it has cooled down. Note: Certain ammo types cannot be used.
|
Controls
|
Controls
|
| Switch Skills Set 4 (Silkbind) | |
Counter Shot |
Rising Moon |
| A parrying skill using Wirebugs. Absorbs an attack from a monster without taking any damage. Follow up with a powerful counterattack. (Wirebug Gauge recovery speed: Fast)
|
A Silkbind technique in which a Wirebug generates a ring of Ironsilk. Special powder accumulates within the ring, and when ammo passes through it, the velocity of the ammo increases, and in turn, extends the ammo's range. This can make certain ammo types viable from farther away. (Wirebug Gauge recovery speed: Fast)
|
Controls
|
Controls
|
| Switch Skills Set 5 (Silkbind) | |
Free Silkbind Glide |
Setting Sun |
| Advance like a raging wildfire. This technique uses a Wirebug to pull you while you glide forward. It can be used to evade attack and adjust position. (Wirebug Gauge recovery speed: Fast)
|
A Silkbind technique in which a Wirebug generates a ring of Ironsilk. Special powder accumulates within the ring, and when ammo passes through it, the velocity of the ammo is decreased. Firing piercing ammo/multi-hit ammo through the ring will boost the total number of hits upon impact. (Wirebug Gauge recovery speed: Fast)
|
Controls
|
Controls
|
Bow
| NEW! Bow Switch Skills introduced with the Sunbreak Expansion | |
|---|---|
| Switch Skills Set 1 | |
Charging Sidestep |
Dodgebolt |
| An evasive skill that covers a lot of ground. You can raise your charge level while dodging, and you can control the direction you dodge in by tilting
|
A spinning evade that doubles as an attack. Baiting the attack and making it a near-miss can fill up the charge level considerably. Also allows you to move forwards, backwards, left or right.
|
Controls
|
Controls
|
| Switch Skills Set 2 | |
Power Shot |
Switch Skill Name |
| A regular shot followed by a particularly powerful shot. Fires shots with a higher level of charge than usual. (Does not exceed maximum level.) |
Switch Skill Description |
Controls
|
Controls |
| Switch Skills Set 3 | |
Melee Attack |
Stake Thrust |
| A basic melee attack. If you perform a Charging Sidestep after a Melee Attack, you can follow-up with a Lunging Melee Attack. Both melee attacks will have the same effect as your currently applied coating but won't consume it.
|
An attack that thrusts an explosive stake into your target. The stake reacts to follow-up attacks, dealing extra damage to the target. The amount of extra damage dealt is determined by type of arrow loosed.
|
Controls
|
Controls
|
| Switch Skills Set 4 (Silkbind) | |
Focus Shot |
Butcher's Bind |
| A Wirebug-based evasion action. After landing, crouching will cause stamina to recover at a rapid pace. (Wirebug Gauge recovery speed: Fast)
|
Fires an arrow loaded with Ironsilk. If the follow-up arrow lands in the same spot as the first, Ironsilk winds around both arrows, inflicting severing damage. If the second arrow is off target, the lodged arrow disappears. (Wirebug Gauge recovery speed: Medium)
|
Controls
|
Controls
|
| Switch Skills Set 5 (Silkbind) | |
Herculean Draw |
Bolt Boost |
| A maneuver using a Wirebug to boost bow-drawing strength. Shots can be fired while evading. (Wirebug Gauge recovery speed: Fast)
|
A maneuver that twines Ironsilk around your arrow. This move deals damage more effectively, and thus requires range adjustment. Activates Super Critical range, boosting damage within that range for a set time. (Wirebug Gauge recovery speed: Medium)
|
Controls
|
Controls
|
 Anonymous
I was using longsword the whole game, and switched to greatsword but the 3rd switchskill in GS isn't unlocked/available.

 Anonymous
 Anonymous
"The second set of Switch Skills are unlocked by forging or upgrading 8 Weapons within a Weapon-type"
To confirm: You have to have possessed 8 different weapons; Easiest way to unlock the switch-skill is to just forge different weapons from the list
 Anonymous
they removed "Hop Reload" to make "Quick Reload" more appealing as an option... idk... i might drop GL for the first time since i started..

 Anonymous
The 8 weapons thing, I think it's specifically 8 unique weapons, else you could juat craft the starter wep 8 times

 Anonymous
meh, LBG doesn't get much. Expected to see the Wyvernblast Counter from IB at least

 Anonymous
Hello, can you help me ? i don't have all the switch skill 1 unlock. I'm on 5stars rank Village quests, and RC3 on the Hub Quests.
Thanks
 Anonymous
Each weapon has 3 sets of switch skills with 2 options each. One Silkbind switch and two weapon attack/mechanics switches. You unlock one set of them by forging and upgrading weapons of a type a total of 8 times. (To unlock GS you'd have to forge or upgrade greatswords 8 times.) The other skill is unlocked by completing high rank quests.

 Anonymous
There is another pair of skills for the switch axe: in axe form, there is a switch skill in regards to pressing forward + x, choices are to perform a quick stab (base kit version) or a slower overhead with higher damage and longer range (due to walking forwards during the attack).

 Anonymous
 Anonymous
I love this feature!!! Just wish there were more switch skills per weapon... they have a real gold mine on their hand here. Hope they expand on it in the future!





Which skills requires the DLC and which dosent? It dosent specify anywhere i can find.
0
+10
-1