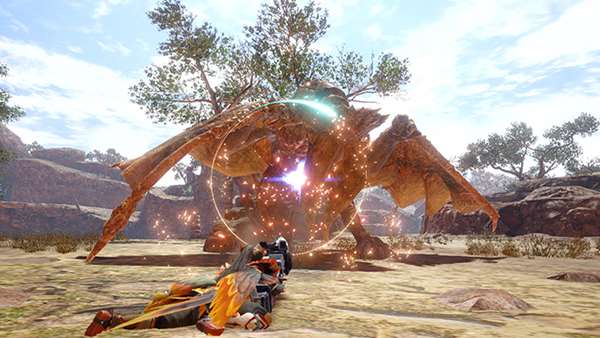
Setting Sun |
|
|---|---|
 |
|
| Skill Set | 5 |
| Switch Skill Weapon | Heavy Bowgun |
Setting Sun is a Heavy Bowgun Switch Skill in Monster Hunter Rise (MHR). Switch Skills are swappable moves in a Weapon's moveset that are only available with the Sunbreak Expansion. Switch Skills can be swapped at any Item Box and Switch Skill combinations can be saved to Item Loadouts. This Switch Skill can be swapped with Free Silkbind Glide and is part of Skill Set 5.
Setting Sun Switch Skill Information
- Switch Skill Type: Silkbind
- Switch Skill can be swapped with: Free Silkbind Glide
Setting Sun Switch Skill Description
A Silkbind technique in which a Wirebug generates a ring of Ironsilk. Special powder accumulates within the ring, and when ammo passes through it, the velocity of the ammo is decreased. Firing piercing ammo/multi-hit ammo through the ring will boost the total number of hits upon impact.
(Wirebug Gauge recovery speed: Fast)
Setting Sun Switch Skill Controls
Switch Controls
Listed blow are the controls for Switch when using this skill:
- While holding
 , press
- (Wirebug Gauge cost:1)
PC Controls
Listed blow are the controls for PC when using this skill:
- While holding Shift, press

- (Wirebug Gauge cost:1)
Setting Sun Notes & Trivia
- Setting Sun Switch Skill Notes, Tips, and other Trivia go here
 Anonymous
Absolutely does not work for either Spread or Shrapnel. The same number of damage ticks show up with or without, and the damage itself is unchanged too.

 Anonymous
This skill doesn't seem to work for me I'm getting the exact same number of hits through or not the ring

 Anonymous
Wiki doesnt seem to state that it DOUBLES the amount of hits that ammo will deal to the target, So for example, If you were hitting a target through its body with Pierce 14 times, This will hit it 28 Times. Translates to Slicing too, Been having a ton of fun effortlessly cutting off tails. Can't recommend this skill enough

 Anonymous

For those how are confused of it. Setting Sun does not add extra hits to your shots, neither does it increas your Damage per hit. What it does is, that it shortens the distance in between the hits.
Pierce 2 and 3 get all its 7 hits through a Narwa head (or the belly Hitzone on the Dummy befor it hits the Shell).
Pierce 1 can get all its 7 hits from belly to the shell of the dummy. (other wise it would be hit only 5-6 depending on the shooting line)
On a target like the head of a Rathalos (or the lower Dummy foot) you can get one more hit with pierce 2 and 3 through befor the rest goes to other zones. For pierce 1 changes nothing on that sized targets.
On targets of the size of a Somnecanth head or smaller is no notable difference for pierce shots.
It works for elemental pierce the same way... but the distance in between hits remains still huge. It is easyer to get more hits in to a monster. But better look for targes with multiple good hitzone in a shooting line. :o
For Shrapnell is it easyer to hit all 5 shot on a target. (if you stand to close to your target, not all your hit will land with this Shottyp. You can stand direct beneath your target with setting sun and get your hits on the monster.... but for this difference you need to realy stand close to the monster. so its not worth it)
I could not find any difference for the behavior of Spread shots... so i dont know about that one. ^^"
1
+10
-1