Zinogreジンオウガ (Jin’ouga) |
|
|---|---|
 |
|
| Enemy Type | Large Monster |
| Species | Fanged Wyverns |
| Elements | |
| Ailments | |
| Weakness | |
| Threat Level | 6⭐ |
| Resistances | |
| Location(s) | Shrine Ruins Flooded Forest The Citadel The Jungle |
| Rampage Role | |
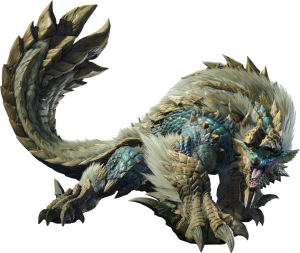
Zinogre is a Large Monster in Monster Hunter Rise (MHR or MHRise). Zinogre is a giant wolf-like creature that is both powerful and dangerous. It has various weaknesses, including Ice and Water, and several status effect vulnerabilities like Poison, Stun, Paralysis, and Sleep. The Zinogre is an intimidating foe, but with the right strategy and knowledge, it can be defeated. Large Monsters such as Zinogre are hostile and are usually the primary objective of Hunts. They provide valuable Materials when defeated.
Zinogre Monster Guide: Characteristics, Weaknesses, Drops, Locations, Weapons & Armor, Strategies, Tips & Tricks and more to help you defeat Zinogre in MH Rise.
Look upon its prowess
Its movement full of spark
Its claws cut through the silence
Its fangs bite through the dark
Gaze upon perfection
Thunder given form
Either knock its lights out
Or die fighting the storm
Zinogre Details & Locations
Fanged wyverns whose bodies are streaked with electricity. Sharp claws and strong limbs allow them to thrive in mountainous terrain. During hunts, they gather numerous Fulgurbugs to boost their power and enter a supercharged state.
- Found in:
Shrine Ruins
Flooded Forest
The Citadel
The Jungle - Hostile at medium range
- Attacks other monsters: Yes
- Small Monsters version: N/A
- Size: ♕ 1078.46 ~ ♕ 1910.41
- Species: Fanged Wyverns
- Target of Quests:
Skies Flash
Clouds Boom
Learn the Long Sword
Occupational Hazards - HP (Tempered): ~??
Zinogre Combat Info
In their supercharged states, Zinogre not only have different attack patterns but also become faster, hit harder, and gain immunity to Shock Traps. Staggering them, however, may knock them out of this state.
- Threat Level: ⭐⭐⭐⭐⭐⭐
- Elemental
 Thunder Damage monster
 - Inflicts
 Thunderblight
 - Weak to
 Ice (⭐⭐)
  Water (⭐)
 - Resistant to
 Thunder (Immune)
 Dragon
 - Kinsect Extracts:
- Red: Head, Back
- Orange: Torso, Hip, Foreleg, Tail, Tail Tip
- White: Hind Leg
- Item Effectiveness:
- Effective: Pitfall Trap, Flash Bomb, Dung Bomb
- Ineffective: Sonic Bomb, Drugged Meat, Poisoned Meat, Tinged Meat
- Enraged Mode: Zinogre becomes supercharged by the Fulgurbugs in its fur, causing its fur to stand on end and glow with a bright silver. Many of its attacks become infused with lightning, dealing significantly more damage and inflicting Thunderblight.
- Rampage: Zinogre fills the
 Stalker Role during Rampage missions. Stalkers tend to focus on attacking hunters, moving very quickly and stalking them across the Stronghold. They can also destroy Hunting Installations if a hunter is manning them.
Quick Combat Tips
- Make sure to bring plenty of healing items, as well as weapons and armor that are well-suited for the fight. Focus on items that allow you to dodge or block the Zinogre's attack, as well as items that increase your attack power.
- Zinogre's weakest spot is its head. Attacking this spot is the key to knocking it down as well as kicking it out of its enraged state.
- Zinogre performs many heavy attacks that slam the ground, sending dozens of Fulgurbugs floating up into the air, indicated by tiny, glowing blue particles. When not supercharged, Zinogre absorbs these fulgurbugs into its back, and their energy charges the up the beast. This is most evident during its Stomp attack. Once enough charge is accumulated, Zinogre enters is enraged state.
- Zinogre's ability to enter enraged mode can be severely hampered by applying constant pressure to its back, scattering the fulgurbugs. Its back is exposed when knocked down so aim for its head frequently. You can also use Silkbind Attacks that propel you upwards such as the Charge Blade's Axe Hopper move. A constant barrage against its head and back is so effective that masterful use of this tactic can result in Zinogre only ever entering enraged state once throughout a hunt or not at all.
- When enraged, many of Zinogre's attacks become infused with lightning and inflict the Thunderblight effect, increasing a hunter's susceptibility to getting stunned. Consider equipping the Stun Resistance skill at level 3 when fighting Zinogre to completely negate this property of the effect.
- While enraged, Zinogre will continue charging electricity in its body to fuel its ultimate Thunderbomb move.
- Do not use Shock Traps against Zinogre! When not enraged, a Shock Trap will supercharge the beast immediately. When it is supercharged, it destroys Shock Traps as it runs through them.
- A great way to fight it is to use ranged weapons and attack from a distance. The Zinogre has high defense and can take a lot of damage, so you'll need to be careful. If you're using a melee weapon, make sure to dodge its attacks and stay out of its line of sight.
- You can use environmental objects to your advantage. The Zinogre is weak against water and can be damaged by attacking it with large water sources like rivers or lakes. You can also use traps to slow it down and make it easier to deal damage.
- Defeating the Zinogre in Monster Hunter Rise can be a challenging task, but with the right strategy and knowledge, you can make it through. Make sure to be prepared, use ranged weapons, and use the environment to your advantage. With patience and skill, you can successfully take down the Zinogre.
Zinogre Attacks & Moveset
Claw Stomp - Zinogre leans towards one side, raises that side's foreleg and smashes the ground in front of it. When uncharged, it will take a moment to absorb the fulgurbugs sent floating in the air as a result of the stomp. It can also follow-up with another Stomp immediately after the first. When enraged, Zinogre will often unleash a stomp combo, smashing with one foreleg and then the other up to 4 times. Each Stomp is also infused with lightning, increasing their hitbox and inflicting Thunderblight. In both cases, dodge forward and under the stomping leg as it is raised.
Horn Uppercut - Zinogre stands on its hind legs, raising its upper body in the air. It then dips its head and scoops its target upwards with its horns, sending them flying. This attack has a very long telegraph as Zinogre takes over a second on its hind legs before executing the attack. Get out of its front side immediately.
Headbutt - Zinogre raises its head, slightly pulled back to one side and then smashes its horn downwards in front of it. It will often follow-up with a Somersault Tail Slam or perform a spinning retreat into a Claw Stomp. The Headbutt itself has a narrow hitbox and is clearly telegraphed.
Shoulder Tackle - Zinogre places one foreleg in front of the other, angling its side toward a hunter. It then throws itself forward, tackling its target with its shoulder. This move has a very large hitbox. Dodge roll around its head to avoid the attack.
Lightning Orbs - Zinogre jumps up and spins laterally very quickly, slamming its tail on the ground and sending a set of 2 lightning orbs flying outwards and to one side. It repeats the move spinning the other way and sending another 2 orbs flying outwards and to the other side.
Somersault Tail Slam - Zinogre turns its rear towards a hunter and then performs a backflip, sending its massive tail crashing on the ground behind it. This attack has a very long range but a narrow hitbox. It also has good tracking so don't dodge too early. Severing the monster's tail will reduce the range on this attack.
Rising Tail Sweep - Zinogre steps back slightly and then pivots on one foreleg as it swings its body in an upward spiral, whipping its tail in a large arc. Dodge underneath its tail towards its pivoting arm (pivoting on left arm, dodge to its left and vice versa) to evade the attack.
Rising Claw - Used exclusively while enraged. Zinogre stands on its hind legs and feints a Claw Stomp with its left claw. During the fake-out, it charges is right claw with electricity and then performs a Streetfighter-style rising uppercut, emiting beams of lightning that jut upwards in the shape of a claw slash. This attack deals massive damage and sends the hunter flying.
Thunderbomb - When enraged and fully charged with electricity, Zinogre lets out a roar and then performs a lightning-infused mad dash in a straight line, attempting to trample hunters. It then turns around, somersaults into the air and divebombs with its back facing the ground, causing a large lightning explosion on impact that sends several lightning bolts striking outside the impact radius. This attack hits very hard and will likely KO hunters with lower level gear. If you are consistent in applying pressure to Zinogre's head while it is enraged, it may never use this move.
Zinogre Weaknesses
The table below indicates the various parts of the monster, including the types of damages that are weak to it. This information is specific to MH Rise.
| Zinogre Parts | |||
|---|---|---|---|
| Head | 65 | 65 | 70 |
| Torso | 25 | 25 | 30 |
| Hip | 44 | 44 | 30 |
| Foreleg | 25 | 30 | 30 |
| Back | 45 | 40 | 35 |
| Hind Leg | 45 | 45 | 35 |
| Tail | 30 | 25 | 25 |
| Tail Tip | 21 | 19 | 10 |
The table below indicates the various parts of the monster, including the different elements that are weak to it.
| Zinogre Parts | |||||
|---|---|---|---|---|---|
| Head | 10 | 10 | 0 | 15 | 5 |
| Torso | 5 | 5 | 0 | 5 | 5 |
| Hip | 5 | 5 | 0 | 10 | 5 |
| Foreleg | 5 | 5 | 0 | 10 | 5 |
| Back | 10 | 20 | 0 | 25 | 5 |
| Hind Leg | 5 | 5 | 0 | 10 | 5 |
| Tail | 5 | 5 | 0 | 5 | 5 |
| Tail Tip | 10 | 15 | 0 | 20 | 5 |
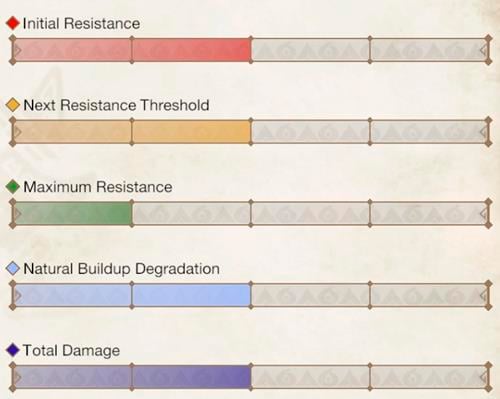
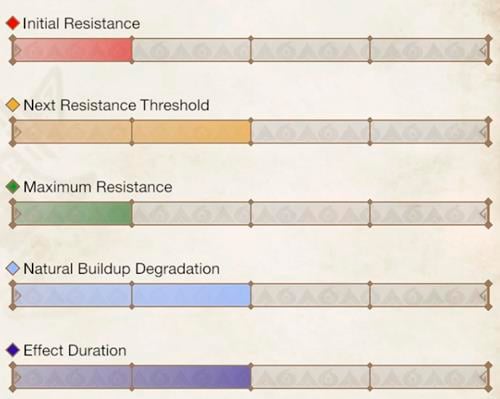
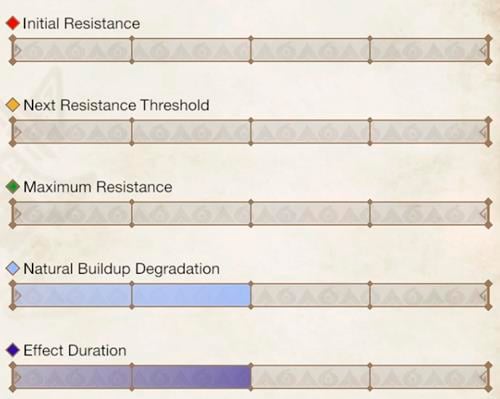
Zinogre Ailment Effectiveness
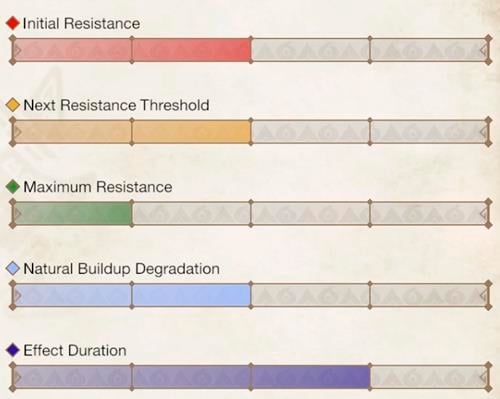
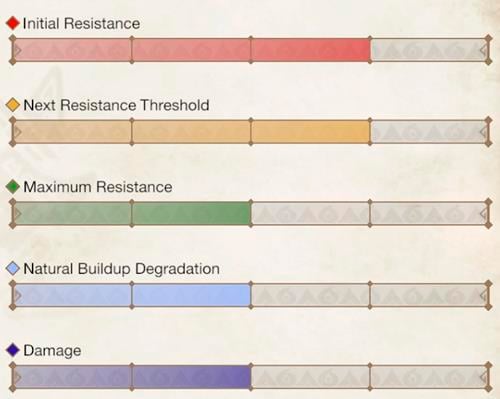
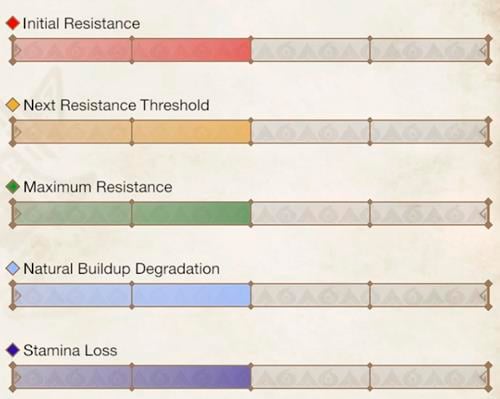
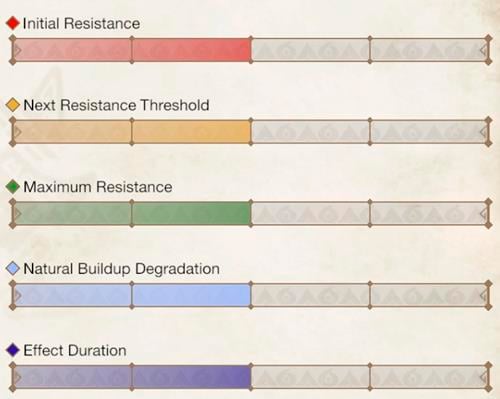
The higher the bars on the graphs and the more stars, the more advantageous it will be for the player. This information is specific to MH Rise.
Zinogre Materials
The tables below contains information on the different Items and Materials that can be obtained from the Low Rank and High Rank variations of Zinogre.
Master Rank Zinogre
The table below indicates the various materials or items obtained from the Master Rank variation of Zinogre, it also includes the percentage chance of how it can be acquired.
| Material | Target Rewards | Capture Rewards | Break Part Rewards | Carves | Dropped Materials |
|---|---|---|---|---|---|
| 21% | 15%[x2] | -- | 33% (Body), 10% (Tail) | 31%, 49% | |
| 33% | 29% | 30% (Back) | 24% (Body) | 40% | |
| 23% | 25% | 70% (Back), 10% (Foreleg) | 17% (Body) | -- | |
| 8% | 7% | -- | 80% (Tail) | -- | |
| 8%[x3] | -- | -- | -- | 15%[x2] | |
| 5% | 5% | 5% (Both Horns) | 1% (Body), 3% (Tail) | 3% | |
| 2% | 3% | 3% (Bathhorns) | 1% (Body), 3% (Tail) | 1% | |
| -- | 16% | 92% (Both Horns) | -- | -- | |
| -- | -- | 70% (Foreleg), 20%[x2] (Both Forelegs) | 22% (Body) | 10% | |
| -- | -- | -- | -- | 10% | |
| -- | -- | -- | -- | 40% | |
| -- | -- | 35% | 35% | -- |
High Rank Zinogre
The table below indicates the various materials or items obtained from the High Rank variation of Zinogre, it also includes the percentage chance of how it can be acquired.
| Material | Target Rewards | Capture Rewards | Break Part Rewards | Carves | Dropped Materials |
|---|---|---|---|---|---|
| 21% | 15%(x2) | -- | 33% (Body), 10% (Tail) | 31%(x1), 49%(x1) | |
| 33% | 29% | 30% (Back) | 24% (Body) | 40% | |
| 23% | 25% | 70% (Back), 10% (Foreleg) | 17% (Body) | -- | |
| 4% | 7% | -- | 80% (Tail) | -- | |
| 12%(x3) | -- | -- | -- | 15%(x2) | |
| 5% | 5% | 7% (Both Horns) | 3% (Body), 7% (Tail) | 3%(x1), 1%(x1) | |
| 2% | 3% | 3% (Both Horns) | 1% (Body), 3% (Tail) | 1% | |
| -- | 16% | 90% (Both Horns) | -- | -- | |
| -- | -- | 70%(x1) (Foreleg), 20%(x2) (Both Forelegs) | 22% (Body) | 10% | |
| -- | -- | -- | -- | 15% | |
| -- | -- | -- | -- | 35% |
Low Rank Zinogre
The table below indicates the various materials or items obtained from the Low Rank variation of Zinogre, it also includes the percentage chance of how it can be acquired.
| Material | Target Rewards | Capture Rewards | Break Part Rewards | Carves | Dropped Materials |
|---|---|---|---|---|---|
| 21% | 15%(x2) | -- | 34% (Body), 17% (Tail) | 29%(x1), 50%(x1) | |
| 31% | 29% | 30% (Back) | 25% (Body) | 40% | |
| 21% | 25% | 70% (Back), 10% (Foreleg) | 18% (Body) | -- | |
| 8% | 12% | -- | 80% (Tail) | -- | |
| 17%(x2) | -- | -- | -- | 20% | |
| 2% | 3% | 3% (Both Horns) | 1% (Body), 3% (Tail) | 1% | |
| -- | 16% | 97% (Both Horns) | -- | -- | |
| -- | -- | 70%(x1) (Foreleg), 20%(x2) (Both Forelegs) | 22% (Body) | 10% | |
| -- | -- | -- | -- | 50% |
Zinogre Weapons & Armor
Armor and Weapons related to the Zinogre Monster.
Weapons
 Usurper's Storm I
 Usurper's Storm II
 Oppressor's Forger
 Despot's Blackstorm +
  Usurper Boltslicer I
  Usurper Boltslicer II
 Despot Boltbreaker
  Despot Boltbreaker +
 Oppressor's Abyss
 Usurper's Firebolt I
 Usurper's Firebolt II
  Despot's Crookbolt
  Despot's Crookbolt +
 Oppressor's Bounty
 Usurper's Fulgur I
 Usurper's Fulgur II
 Despot's Blitz
 Despot's Blitz +
 Oppressor's Miracle
 The Shredder I
 The Shredder II
 The Power Shredder
 The Power Shredder +
 The Lightning Shredder
 The Lightning Shredder +
 Usurper's Downpour I
 Usurper's Downpour II
 Despot's Cloudburst
 Despot's Cloudburst +
 Oppressor's Torrent
 Usurper's Roar I
 Usurper's Roar II
 Despot's Phlogiston
 Despot's Phlogiston +
 Oppressor's Skyfall
 Despot's Paroxysm +
 Oppressor's Making
 Despot's Wildfire +
 Oppressor's Rift
 Oppressor's Thunderclap
 Despot's Twinbolt +
 Despot's Twindart
 Usurper's Thunder I
 Usurper's Thunder II
 Despot's Crackle
 Despot's Crackle +
 Oppressor's Sway
 Usurper's Growl I
 Usurper's Growl II
 Despot's Thunderclap
 Despot's Thunderclap +
 Oppressor's Boon
 Usurper's Coming I
  Usurper's Coming II
  Despot's Cacophony
 Despot's Cacophony +
 Oppressor's Genesis
Zinogre Buddies Weapons & Armor
Palico and Palamute Armor and Weapons related to the Zinogre Monster.
Palico
Notes & Trivia
- Can be lured with ??
- Camouflage works until ?? range
 Anonymous
 Anonymous
lol am on high rank hub quests and went back to village quests to get a low rank material for zinogre and i died in seconds with full high rank upgraded diablos armor... what the hell happened X'D

 Anonymous
 Anonymous
The world version of this fight was so much more enjoyable, they did him dirty in rise

 Anonymous
 Anonymous
I don't know if the mechanic is in Rise, but don't shock trap him he probably breaks out fast and enters charged mode

 Anonymous
Was shocked when I realized this guy does not resist Thunder




GIVE ME THE PLATE CAPCOM
0
+10
-1