Diablosディアブロス (Diaburosu) |
|
|---|---|
 |
|
| Enemy Type | Large Monster |
| Class | Flying Wyvern |
| Threat Level | 7⭐ |
| Element | None |
| Ailment(s) | None |
| Weakness(es) | Paralysis |
| Resistance(s) | |
| Location(s) | Sandy Plains |
| Rampage Role | |
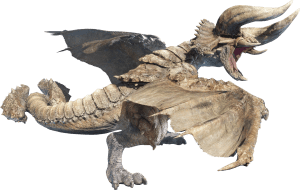
Diablos is a Large Monster that appears in Monster Hunter Rise (MHR or MHRise). Diablos is a large, bipedal wyvern with a fierce attitude and an armor-like shell of hard scales that make it difficult to injure. Diablos is typically found in the sandy deserts of the Sandy Plains, although it can also be seen in the Lava Caverns and the Flooded Forest. Diablos has a reddish-brown body that is covered in thick scales, with a long, spiky tail and two large horns jutting out of its skull. Its wings are broad and powerful, allowing it to fly at high speeds. Its eyes glow a menacing yellow, and it screams in a terrifying manner that can be heard from miles away. Large Monsters like Diablos are hostile and are usually the primary objective of Hunts. They provide valuable Materials when defeated.
Diablos Monster Guide: Characteristics, Weaknesses, Drops, Locations, Weapons & Armor, Strategies, Tips & Tricks and more to help you defeat Diablos in MH Rise.
The wide plains of the desert
A heated battle ground
Suddenly, a rumbling
A world-shattering sound
Twin horns split the sand below
No longer earthbound
For this is the true ruler
Of this dry dystopia
Trespassers shall be punished
Protect thy cornucopia
MH Rise Diablos Characteristics & Ecology
Known as the "Tyrant of the Desert." The Diablos is extremely territorial and will use its massive horns to charge at invaders. Diablos have the ability to borrow underground and use this ability to strike from below, however, their sensitive ears make them susceptible to Sonic Bombs. Despite their predatory appearance, they are herbivorous and mostly feed on cactus.
Diablos can be found in the Sandy Plains, the Lava Caverns, and the Flooded Forest of Monster Hunter Rise. In the Sandy Plains, it is usually found near the sand dunes, while in the Lava Caverns it inhabits the lower levels. The Flooded Forest is a bit harder to find it, as it typically stays away from the heavily-forested areas.
- Species: Flying Wyvern
- Size: ♕ 1865.66 ~ ♕ 2578.39
- Small Monster version: N/A
- Hostile at medium range
- Attacks other monsters: Yes
- Found in:
Sandy Plains - Turf War(s):
vs. Anjanath
vs. Rathian
vs. Barroth
vs. Diablos
- Target of Quest(s):
Twisted Desire
Subterranean Disturbances
A Quartet of Horns
Fought, Failed, Fired Up
MH Rise Diablos Combat Info
Diablos can be forcibly brought to the surface by using loud sounds. And its charging attack, while devastatingly powerful, can be baited into colliding with anthills, momentarily getting the Diablos stuck.
- Threat Level: ⭐⭐⭐⭐⭐⭐⭐
- Physical Damage monster
- Resistant to
 Fire (Immune)
- Kinsect Extract:
- Red: Head, Horn, Neck
- Orange: Back, Tail, Tail Tip
- White: Abdomen, Wing, Leg
- Item Effectiveness:
- Effective: Shock Trap, Pitfall Trap, Flash Bomb, Dung Bomb
- Effective when Burrowing: Sonic Bomb
- Ineffective: Drugged Meat, Poisoned Meat, Tinged Meat
- Enraged Mode: Expels black smoke from its mouth and becomes even more aggressive.
- Rampage: Diablos fills the
 Stalker Role during Rampage missions. Stalkers tend to focus on attacking hunters, moving very quickly and stalking them across the Stronghold. They can also destroy Hunting Installations if a hunter is manning them.
Quick Combat Tips
- Diablos' weakspots are its head and tail. However, its horns and tail tip are incredibly tough. Attacking its horn requires a weapon with Blue Sharpness at minimum to prevent it from deflecting your attacks. When attacking the tail, avoid the tail tip to deal maximum damage. Its abdomen and legs are also good spots for dealing damage if the monster's height proves too difficult to hit its head. Consistent pressure on its legs will cause a knockdown.
- Diablos has a deceptively large hitbox for most of its attacks. Ensure sufficient spacing and dodge early to avoid its most devastating moves.
- Diablos is weak to ice and water-based attacks, so bringing along a weapon with these elements will be beneficial in taking it down
- Breaking both of Diablos' horns will reduce the range and damage of its charge attacks. Prioritize this to minimize its damage capabilities. However, beware as Diablos is most dangerous from its front so try to keep to its flank while aiming for its horns.
- Diablos will often charge its prey with reckless abandon. Position yourself in front of walls and other solid structures to bait its charge and get its horns stuck, allowing for a window to counterattack.
- Diablos likes to burrow underground and impale its opponents from below. You can force it out of the ground by using Sonic Bombs which will give you a small opening for punishment.
- Flash Bombs will blind the Diablos temporarily, preventing it from using charge attacks for the duration.
Diablos Attacks & Moveset
Gore - Diablos' most common form of attack. It swivels its entire body from one side to the other and then in the opposite direction, attempting to impale hunters with its massive horns. This attack deals heavy damage and knocks players away. It has a very large hitbox, especially in the front of the monster but can also clock hunters from its flank.
Side Tackle - Diablos angles its side towards hunters and then forcefully bashes its entire body sidewards, sending hunters hit flying. This move has a very large hitbox and can catch hunters even from behind the attack's direction. Watch your positioning!
Charge Attack - Diablos will frequently charge at hunters attempting to impale them. Diablos' charging attacks are exceedingly dangerous, especially if the horns are intact and can result in a KO if hunters are not sufficiently prepared. Diablos performs three different variants of its charge with very subtle differences.
- Quick Charge - Diablos steps back a very short distance while lowering its horns and then quickly dashes forward, impaling anything in its path.
- Standard Charge - Diablos locks onto a target from a distance, lets out a quick roar and then dashes towards a hunter, flicking its horn outward at the end of the run.
- Powerful Charge - Diablos takes small deliberate steps to reposition itself as it picks a target and then violently shoves its horns into the dirt as it makes a mad dash forward, flicking its horns outwards at the end of the run. This charge deals the most damage and knocks players sky high.
Burrowing Strike - Diablos dives into the ground and begins burrowing towards its target. Its path is indicated by crumbling debris. When it reaches its target, it bursts forth underneath them, dealing devastating damage and launching hunters caught in the attack. If the Diablos is enraged, it will burrow a short distance away from its target and then violently jump out of the ground towards them, bashing them with its horns. This enraged version hits twice, once as the monster lands and then the follow up horn bash. Shield users beware of this double hit and do not end your guard prematurely. If you are not confident with your dodging ability, sheathe your weapon immediately when you see the Diablos dive underground and prepare to do an Emergency Evade.
Tail Sweep - Diablos lowers its head and tilts it sideways and then sweeps its tail in a near 180-degree arc and then once more, returning it to its original orientation. Be aware of the double spin and do not commit to a counter until both sweeps are done.
Tail Smash - Diablos quickly turns backwards and whips its tail aggressively at the ground behind it, sending a large chunk of debris hurtling towards hunters. It often does this when hunters keep their distance.
Diablos Weaknesses
The table below indicates the various parts of Diablos, including the damage values for each weapon type. This information is specific to MHRise.
| Diablos Parts | |||
|---|---|---|---|
| Head | 45 | 60 | 40 |
| Horn | 21 | 42 | 20 |
| Neck | 40 | 40 | 25 |
| Abdomen | 65 | 70 | 40 |
| Back | 25 | 42 | 35 |
| Wing | 40 | 30 | 60 |
| Leg | 35 | 35 | 35 |
| Tail | 50 | 24 | 45 |
| Tail Tip | 23 | 26 | 10 |
The table below indicates the various parts of Diablos, including the damage values for each element. This information is specific to MHRise.
| Diablos Parts | |||||
|---|---|---|---|---|---|
| Head | 0 | 15 | 10 | 25 | 15 |
| Horn | 0 | 20 | 10 | 25 | 20 |
| Neck | 0 | 15 | 5 | 20 | 15 |
| Abdomen | 0 | 25 | 10 | 30 | 25 |
| Back | 0 | 20 | 10 | 25 | 20 |
| Wing | 0 | 25 | 10 | 30 | 25 |
| Leg | 0 | 10 | 5 | 15 | 10 |
| Tail | 0 | 20 | 10 | 15 | 20 |
| Tail Tip | 0 | 20 | 10 | 25 | 20 |
Diablos Ailment Effectiveness
The higher the bars on the graphs and the more stars, the more advantageous it will be for the player. This information is specific to MHRise.
Diablos Materials
The tables below contain information on the materials that can be obtained from the Low Rank, High Rank and Master Rank variations of Diablos. This information is specific to MHRise.
Master Rank
The table below indicates the various materials or items obtained from the Master Rank variation of Diablos, it also includes the percentage chance of acquiring the materials.
| Material | Target Rewards | Capture Rewards | Break Part Rewards | Carves | Dropped Materials |
|---|---|---|---|---|---|
| 24% | 40% | -- | 39% (Body), 13% (Tail) | 24%, 50% | |
| 42% | 33% | 80% (Back) | 48% (Body) | 35% | |
| 10% | 12% | -- | 70% (Tail) | -- | |
| 9%[x2] | -- | -- | -- | 25%[x2], 15[x2] | |
| 12% | 10% | 20% (Back) | 10% (Body), 12% (Tail) | -- | |
| 3% | 5% | -- | 3% (Body), 5% (Tail) | 1% | |
| -- | -- | 100% (Both Horns) | -- | -- | |
| -- | -- | -- | -- | 50% | |
| -- | -- | 40% | 40% | -- |
High Rank Diablos
The table below indicates the various materials obtained from the High Rank variation of Diablos and the drop rates for each.
| Material | Target Rewards | Capture Rewards | Break Part Rewards | Carves | Dropped Materials |
|---|---|---|---|---|---|
| 18% | 29% | -- | 40% (Body), 13% (Tail) | 24%, 50% | |
| 35% | 23% | 50% (Back) | 33% (Body) | 35% | |
| 13%[x2] | 11%[x2] | -- | 12%[x2] (Body) | -- | |
| 5% | 9% | -- | 70% (Tail) | -- | |
| 9%[x2] | -- | -- | -- | 25%[x2], 15%[x2] | |
| 10% | 13% | 30% (Back) | 7% (Body) | -- | |
| 7% | 10% | 20% (Back) | 5% (Body), 12% (Tail) | -- | |
| 3% | 5% | -- | 3% (Body), 5% (Tail) | 1% | |
| -- | -- | 100% (Both Horns) | -- | -- | |
| -- | -- | -- | -- | 10% | |
| -- | -- | -- | -- | 40% |
Low Rank Diablos
The table below indicates the various materials obtained from the Low Rank variation of Diablos and the drop rates for each.
| Material | Target Rewards | Capture Rewards | Break Part Rewards | Carves | Dropped Materials |
|---|---|---|---|---|---|
| 16% | 28% | -- | 40% (Body), 18% (Tail) | 15%, 50% | |
| 33% | 25% | 80% (Back) | 32% (Body) | 35% | |
| 25% | 21% | -- | 23% (Body) | -- | |
| 7% | 16% | -- | 70% (Tail) | -- | |
| 12% | -- | -- | -- | 35%, 15%[x2] | |
| 7% | 10% | 20% (Back) | 5% (Body), 12% (Tail) | -- | |
| -- | -- | 100% (Both Horns) | -- | -- | |
| -- | -- | -- | -- | 50% |
Diablos Weapons & Armor
The following are weapons and armor sets related to Diablos. This information is specific to MHRise.
Diablos Weapons
 Studded Club I
  Studded Club II
 Spiked Bat
  Spiked Bat +
 Barbarian Terror
 Barbarian Terror +
 Diablos Bashers I
 Diablos Bashers II
  Diablos Mashers
  Diablos Mashers +
 Diablos Smashers
 Diablos Smashers +
 Alacrantze III
 Scorpion Lance
 Roaring Wyvern
 Diablos Lance I
 Diablos Lance II
  Diablos Spear
 Diablos Spear +
 Cera Creos
 Cera Creos +
 Quarrel Hornsword I
 Quarrel Hornsword II
 Feud Hornsword
 Blade of Tartarus
 Carapace Buster +
 Chrome Hell +
 Kamura Warrior Cleaver +
 Valtos Rapier
  Vendetta Hornsword +
 Feud Hornsword +
 Vendetta Hornsword
 Kamura Warrior Ballista +
 Guerrera Herald +
 Diablazooka +
 Horned Demonica
 Horned Demonica +
 Kamura Warrior Glaive +
 Tyrant Rod +
 Horned Tyrant
 Horned Tyrant +
 Cera Strongarm +
 Cera Cediment
 Cera Cediment +
 Diablos Hammer I
 Diablos Hammer II
 Diablos Tail
 Diablos Maul +
 Finishing Hammer
 Finishing Hammer +
 Duo Horn I
 Duo Horn II
 Duo Risoluto
 Duo Risoluto +
 Horned Tyrant's Horn
 Horned Tyrant's Horn +
 Diablos Gunlance I
 Diablos Gunlance II
 Diablos Cannon
 Diablos Cannon +
 Diablos Horncannon
 Diablos Horncannon +
 Axe Semper Tyrannis I
 Axe Semper Tyrannis II
 Grand Chaos
 Grand Chaos +
 Axe of Gaia
 Axe of Gaia +
Diablos Armor
Diablos Buddy Weapons & Armor
The following are Palico and Palamute weapons and armor sets related to Diablos. This information is specific to MHRise.
Palico
Diablos Buddy Weapons
Diablos Buddy Armor
Palamute
Diablos Buddy Weapons
Diablos Buddy Armor
Diablos Notes & Trivia
- Introduced in Monster Hunter.
- Name written as 角龙/角龍 in Chinese.

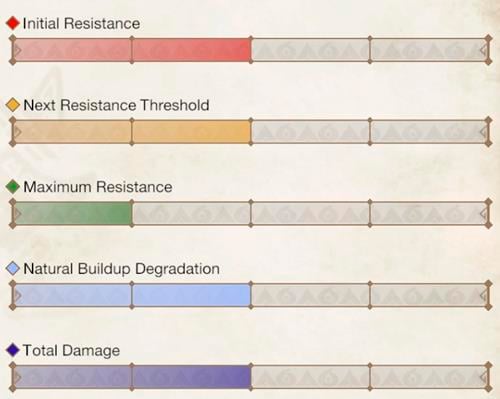
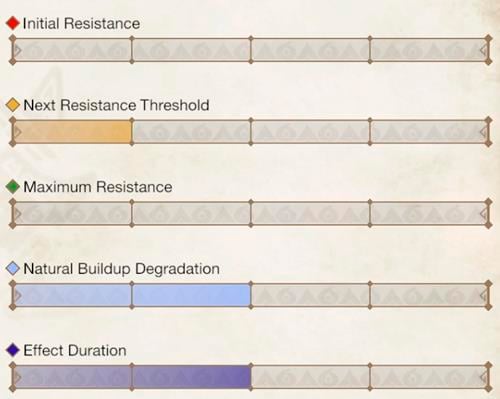
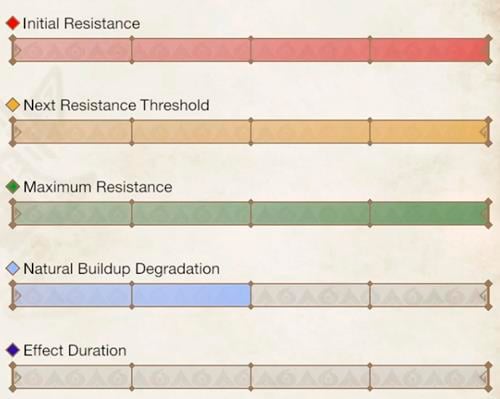
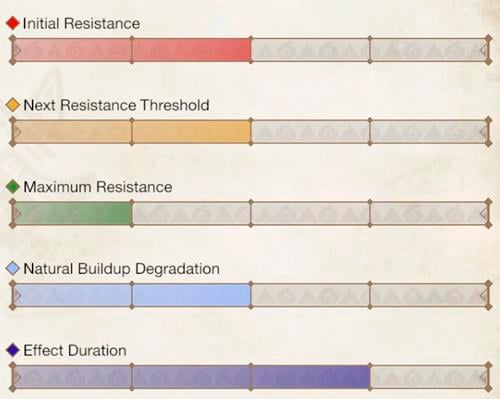
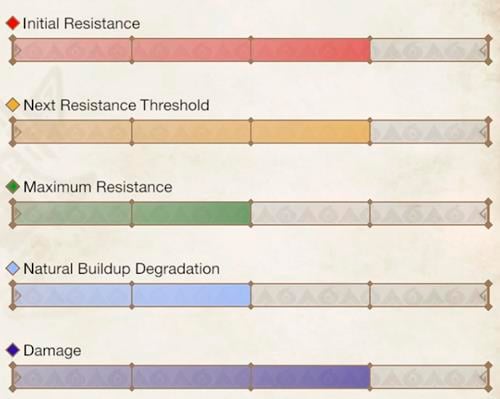
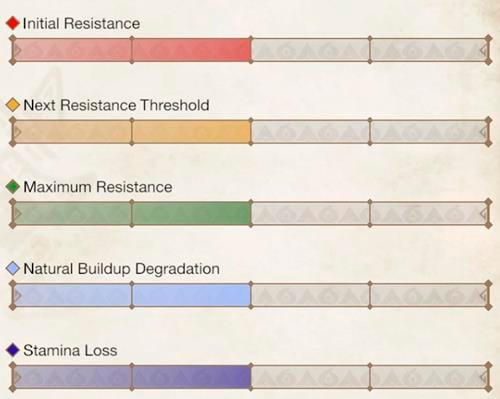


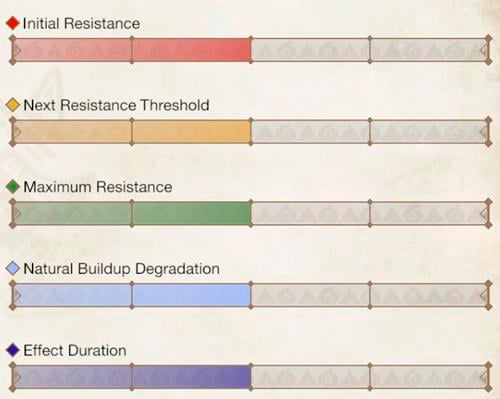
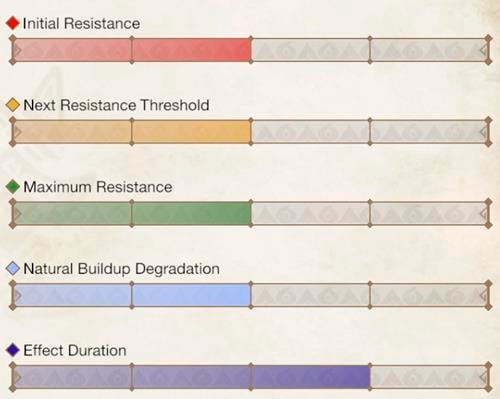
Paralysis is shown on the page as being 3 star effect (so the best) yet the monster's graph indicates that it's basically immune to paralysis. I think I'ma trust the in-game table over this webpage.
1
+11
-1